Setup Footprint User Access Control
Footprint , Footprint Mobile Web, and Footprint Customer Portal use Microsoft Entra ID (formerly Azure Active Directory) to manage user access. Therefore, all users must have an Entra ID login, either directly through their organization or via invitation.
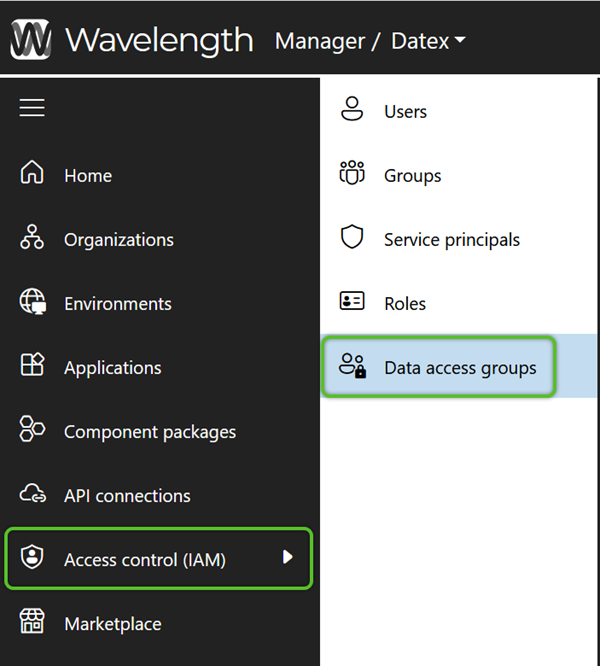
Datex Manager however, is how access for those users is configured. Through Datex Manager, users can setup multiple Roles and Data Access Groups, controlling what Footprint and Footprint Customer Portal users can do and see in the applications. Management and data access for Footprint Mobile users can also be controlled, however, the behavior of their Role cannot be managed in Datex Manager at this time. The following is a high-level look at these concepts, with links to more specific articles and examples.
Overview
There are different user entities in Datex Manager, and that Account is assigned to at least one (1) Role and one (1) Data Access Group.
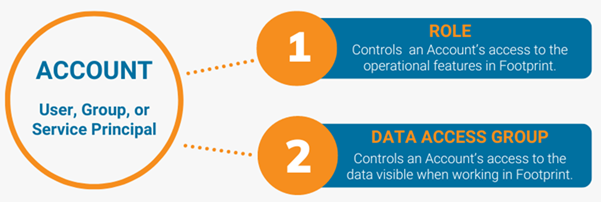
There are three (3) User entity types that can be granted access based on their assigned Roles and Data Access Groups: User, Group, and Service Principal.
-
User: an individual user entity; based on the organization's Entra ID Users.
-
Group: a joint entity for a group of users; based on the organization's Entra ID Groups.
-
Service Principal: an entity used for an organization's application integrations; based on the organization's Entra ID Service Principals. For example, Shopify requires an account with distinct permissions. Creating a Service Principal account for this integration provides the benefit of a secure, dedicated login and authorization for the active, ongoing integration between the two systems.
Adding an entity for one of these types does not grant the entity access. Further steps must be taken to specify the access details for any new entity.
For simplicity, the articles regarding user setup will use " User" as a blanket term to refer to all types of user entities. The same steps can be applied to the Group and Service Principal user entities as can be applied to the User entity type in terms of Role and Data Access Group assignment.
There are two (2) access control types which must be applied to a user entity: Roles and Data Access Groups.
-
Roles: control access to the specified operations that can be performed in Footprint. For example, some users may have the ability to access Billing features, other users may have access to approve Cycle Counts, or some users may not have access to the Delete button. A user may be assigned to as many Roles as needed.
-
Data Access Groups: control access to specified data entities within the Role (Warehouses, Owners, Projects, etc.). For example, some users may only need access to data for the warehouse in which they perform duties instead of data for all the organization's warehouses. Additionally, Footprint Customer Portal users should have dedicated Data Access Groups that ensure they only see data for their Owner and Project(s) and not any data for another customer's Owner and Project(s).
Note
User, Group, and Service Principal Accounts must be assigned at least one (1) Role and one (1) Data Access Group.
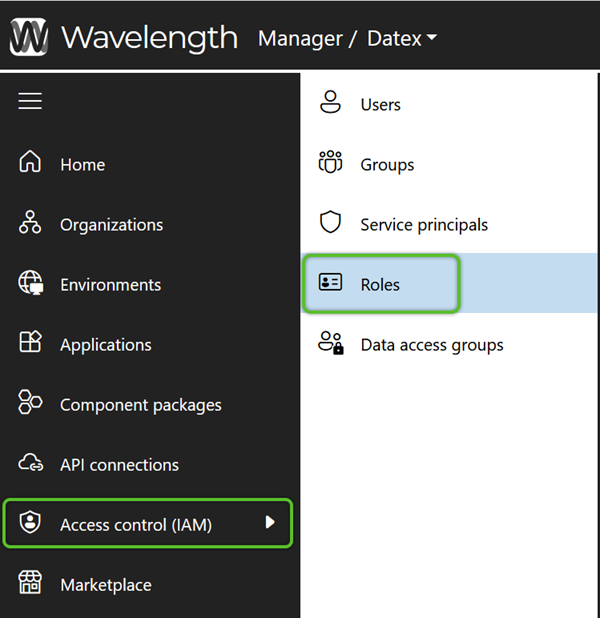
Configure Roles
Datex Manager allows you to create and manage Roles, to which users can be assigned. For users to have access to Footprint and Footprint Customer Portal, these Roles must also be assigned to that Footprint application. Each Role defines what assigned users can do and access in Footprint and Footprint Customer Portal. An organization can have multiple Roles, often related to a user's job is and use of the application. Some examples include a CSR Role, a Billing Role, and for Footprint Customer Portal, a specific Portal User Role.
Note
At this time setting up Roles for Footprint Mobile users is not handled in Datex Manager and will need to be handled separately or through Datex.
The following are intended to be high level steps. If a more detailed breakdown of a given step is required, click on the step itself to open the linked section of the Configure Footprint User Roles Tutorial.
Configure Data Access
Once Roles have been made defining how a user might use and function in Footprint and Footprint Customer Portal, Data Access Groups need to be created, defining what those users can and cannot see in terms of data. For example, if an organization is using the Footprint Customer Portal, Data Access Groups should be created for each customer. This ensures that customers only see orders, materials, and inventory associated with their own Owner and Project.
The following are intended to be high level steps. If a more detailed breakdown of a given step is required, click on the step itself to open the linked section of the Configure Footprint Data Access Groups Tutorial.
Grant User Access
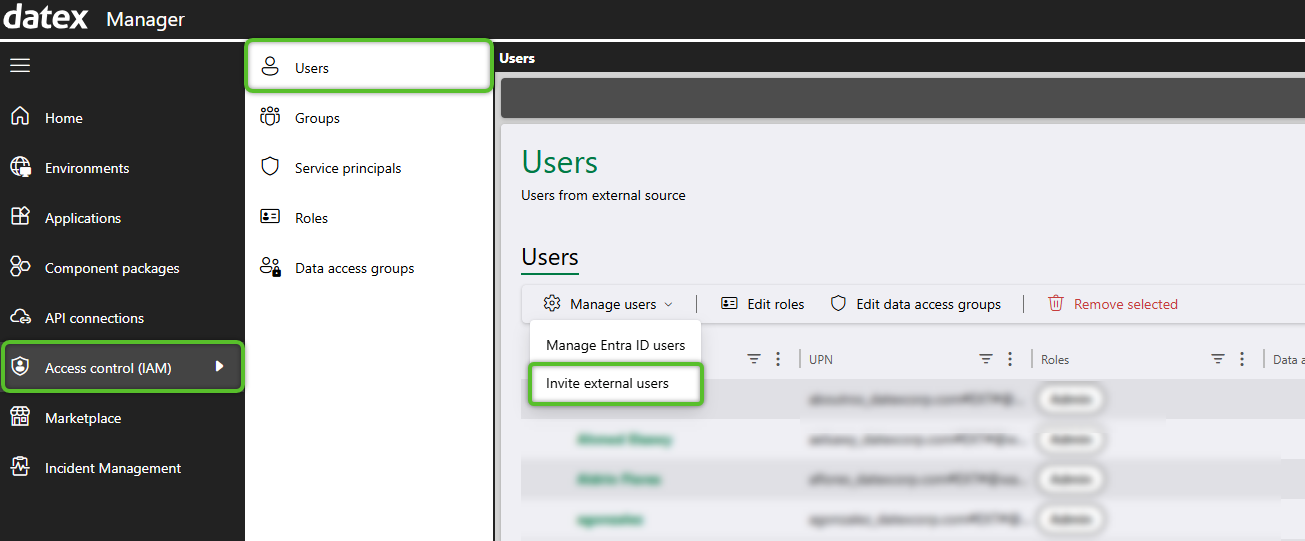
While users can be added at any time, they should only be added after at least one Role and one Data Access Group have been set up. While each organization is required to have one Role and one Data Access Group (typically Admin), it is recommended to create at least one additional Role and Data Access Group for assigning users. As a reminder, any new user must first be invited to the organization’s Microsoft Entra ID tenant before adding them as a user in Datex Manager.
The following are intended to be high level steps. If a more detailed breakdown of a given step is required, click on the step itself to open the linked section of the Setting up a Footprint User Tutorial.
Adding a user when Datex hosts the Microsoft Entra ID:
Adding a users when an organization host their own Microsoft Entra ID:
1. Before a user can be added to Datex Manager, the user must first be added to Microsoft Entra ID. If an organization is managing their own tenant, they will need to work with their IT team to invite users to their tenant.
Related Tutorial:
Example Setups
Not sure where to start? The following are some example setups you can reference when creating your own Roles and Data Access Groups. These examples will not walk through the process step by step, but give some specific settings and concepts to supplement the other tutorials:
Admin Roles and Data Access Groups will likely exist out of the box for your organization, but this example will give you a few items to keep in mind.
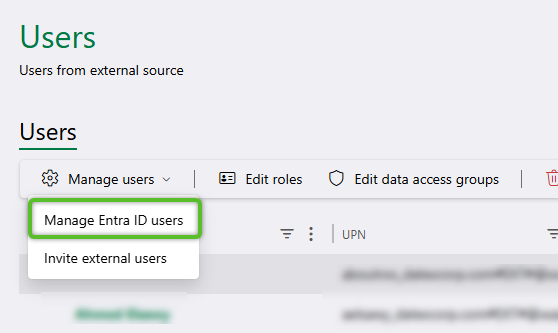
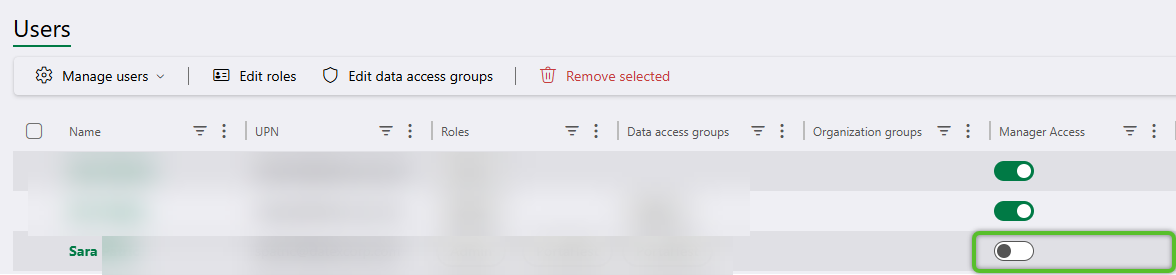
1. An admin user can be added the same as any other user. However, on Access control (IAM)>Users, if the user will need to access Datex Manager make sure the Manager Access toggles are on for the specific user. You will likely not want a lot of users accessing Datex Manager so this step is optional, but it is worth keeping in mind when setting an admin level user especially if they'll be manager user access at all.

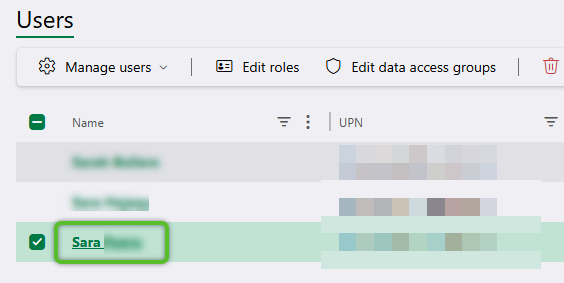
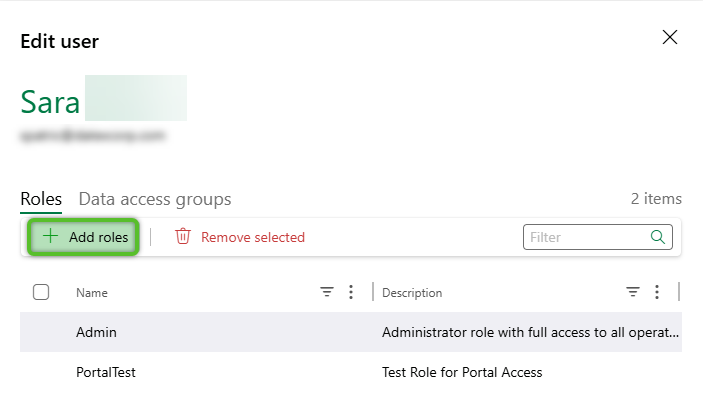
2. Once the Manager and/or Studio access is toggled on, click the user's name to open their information flyout. From the Roles tab, assign the user to the Admin Role.
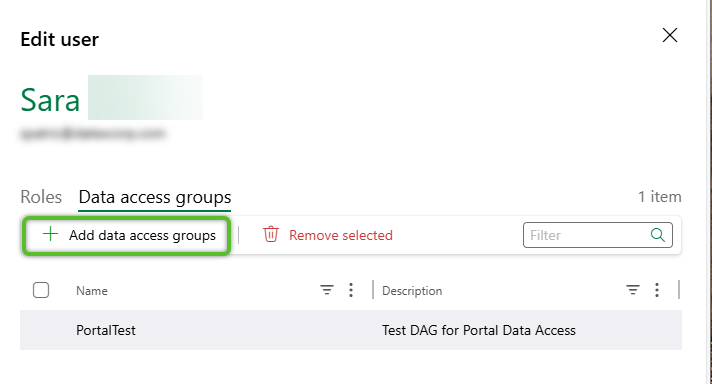
3. From the Data access groups tab, assign the user to an Admin Data Access Group (DAG). When first setting up your instance it is recommended to have at least one DAG that can see all data, or in other words data filters are not applied.
If your organization is using Footprint Customer Portal there are a number of factors to keep in mind when setting users up. The following example for a Demo Customer contains some key points to keep in mind.
1. For the sake of this example, the organization wants all customers accessing the Footprint Customer Portal to use the same functionality. With that in mind, there will be one Role, "PortalUsers", and all FootprintCustomer Portal users will be assigned to that Role.
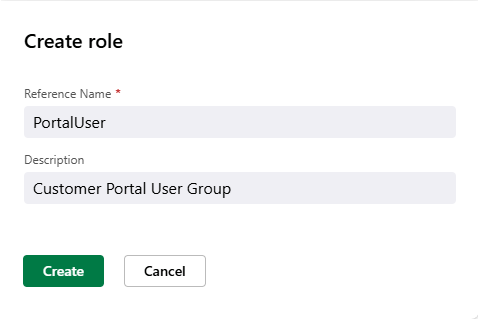
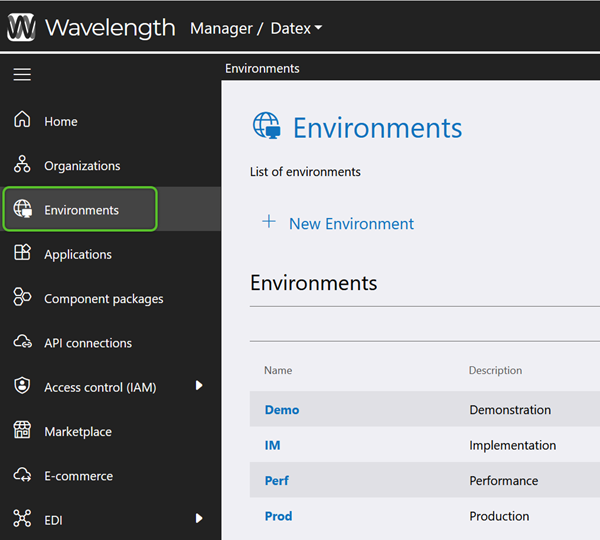
2. Once that Role is created, it needs to be assign to the Footprint Customer Portal in the Prod Environment. To do so, navigate to Environments, select the Prod environment, then select the Footprint Customer Portal and finally use the + Add role button.
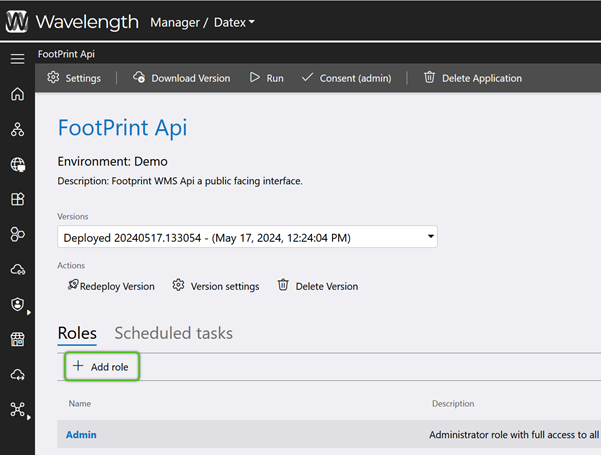
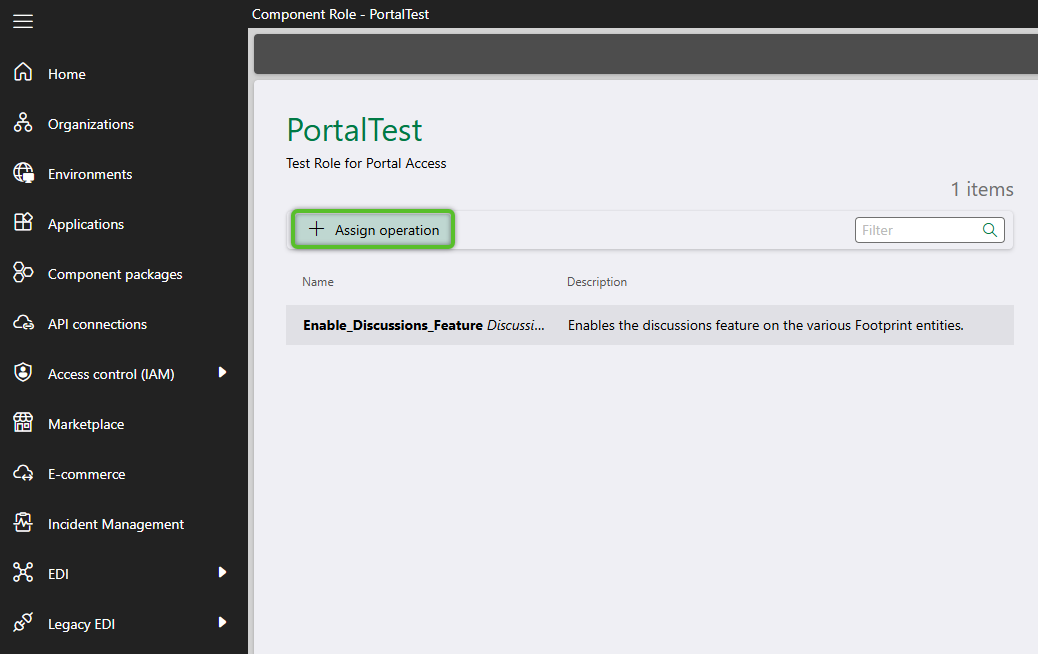
3. After the Role is added, click on its Name to open its page and use the +Assign Operations button to open the operations selection window.
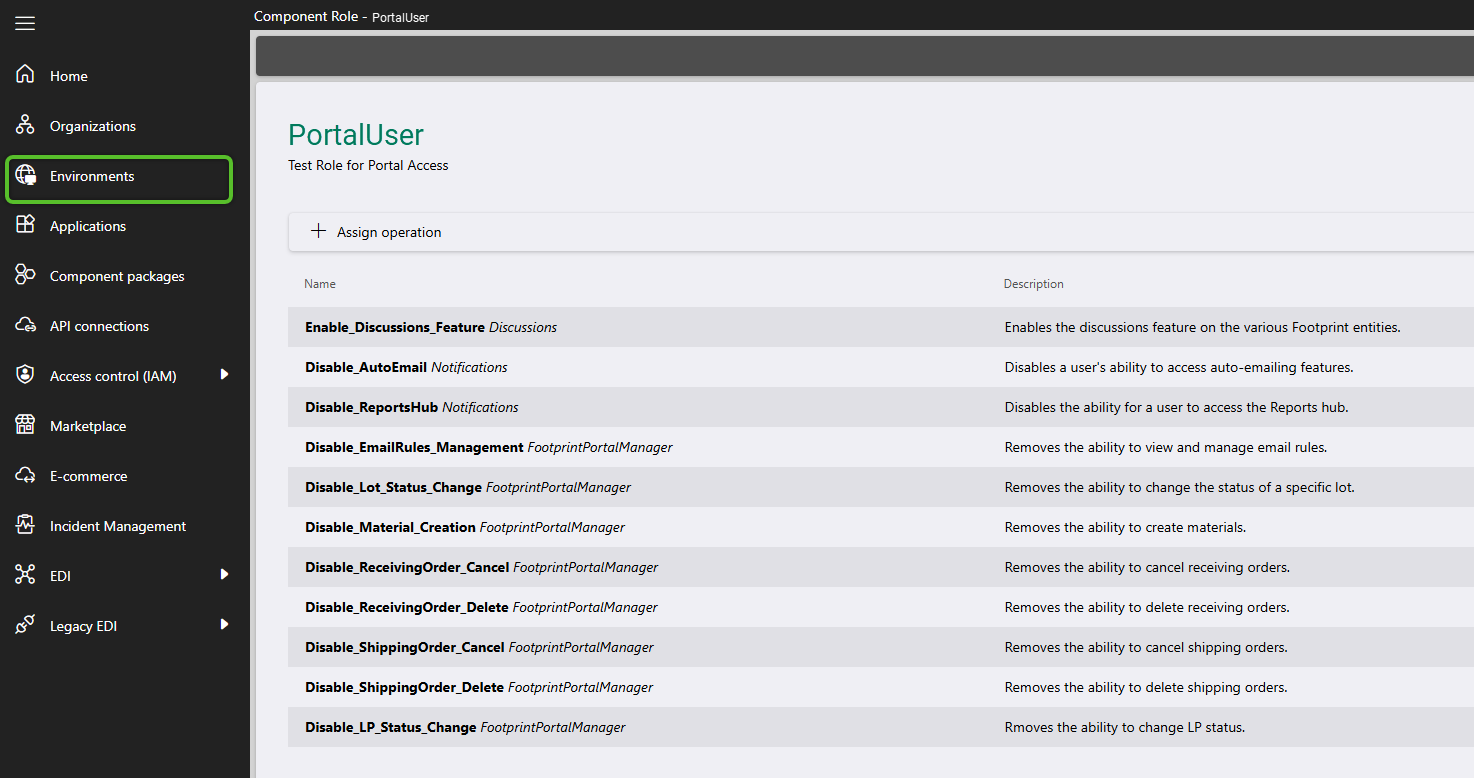
For this example, Footprint Customer Portal users should be able to use the Discussion function, however we don't want them to to Delete or Cancel any of their Inbound or Outbound Orders. Additionally, while they can view their Materials and make edits, they cannot create new Materials or change the status of any Lots or License Plates. Finally, this organization has chosen to hide the Reports Hub and auto-email setup features as they will control these features through Footprint.
The following operations have been included or excluded to support this configuration. Additional operations may be added as needed, and it is strongly encouraged to test any Role thoroughly before taking it live.
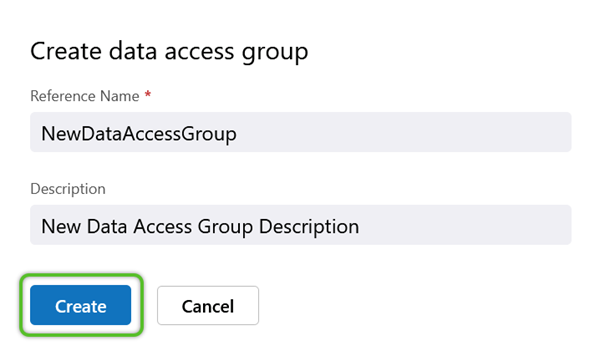
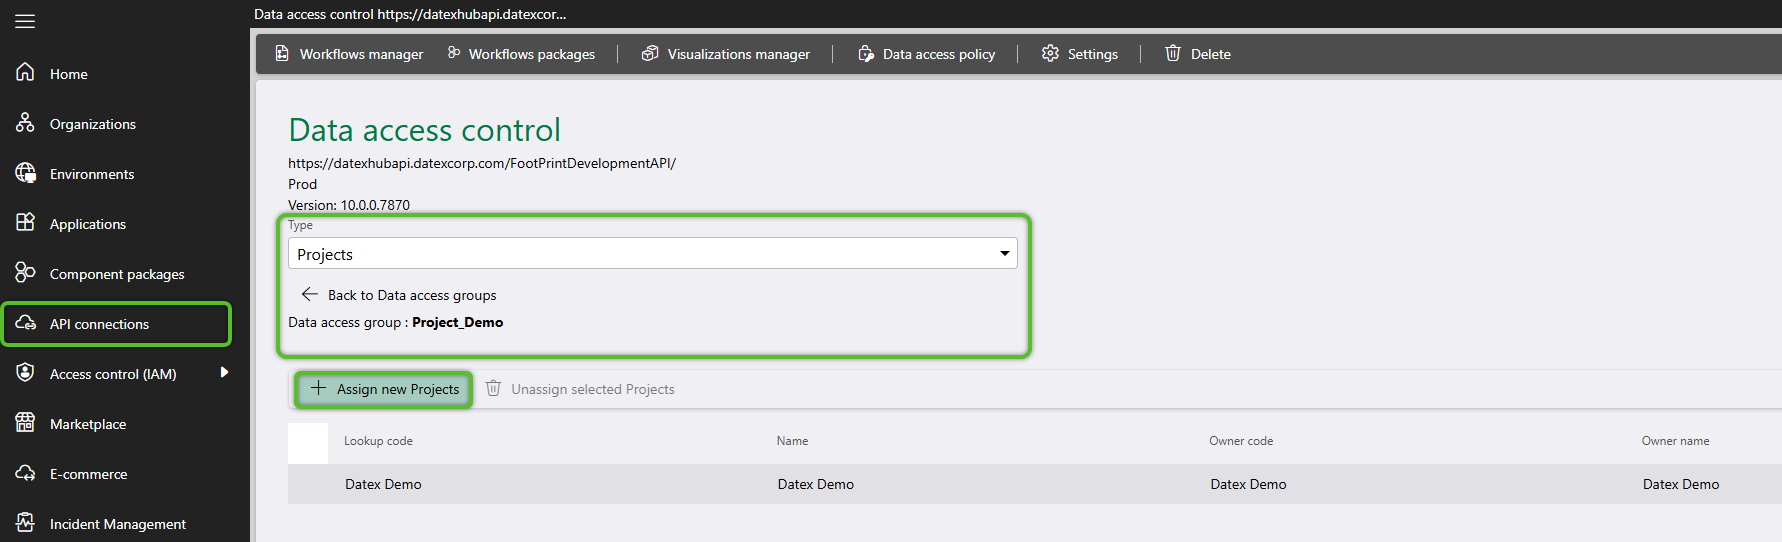
4. Now that the Role is set up, a Data Access Group (DAG) needs to be created for Demo Customer. In Footprint, this customer is represented by the Owner “Datex Demo” and the Project “Datex Demo.” Since there is only one project, configure the DAG to filter by that project and name it “Project_Demo.” Because the organization has only one warehouse, a separate DAG for the warehouse is not required.
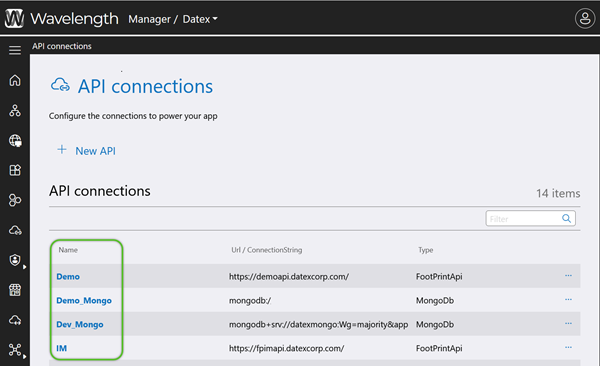
5. Once the DAG has been created, navigate to API Connections. Since this configuration is for the :"Prod" environment, select the API Connection with the Name “Prod” and the Type “FootPrintApi.” After selecting it, set the Type to “Project,” add the DAG “Project_Demo,” and include “Datex Demo” in it. For a more detailed breakdown of this process, refer to Step 2 of the Configuring a Data Access Group How-To.
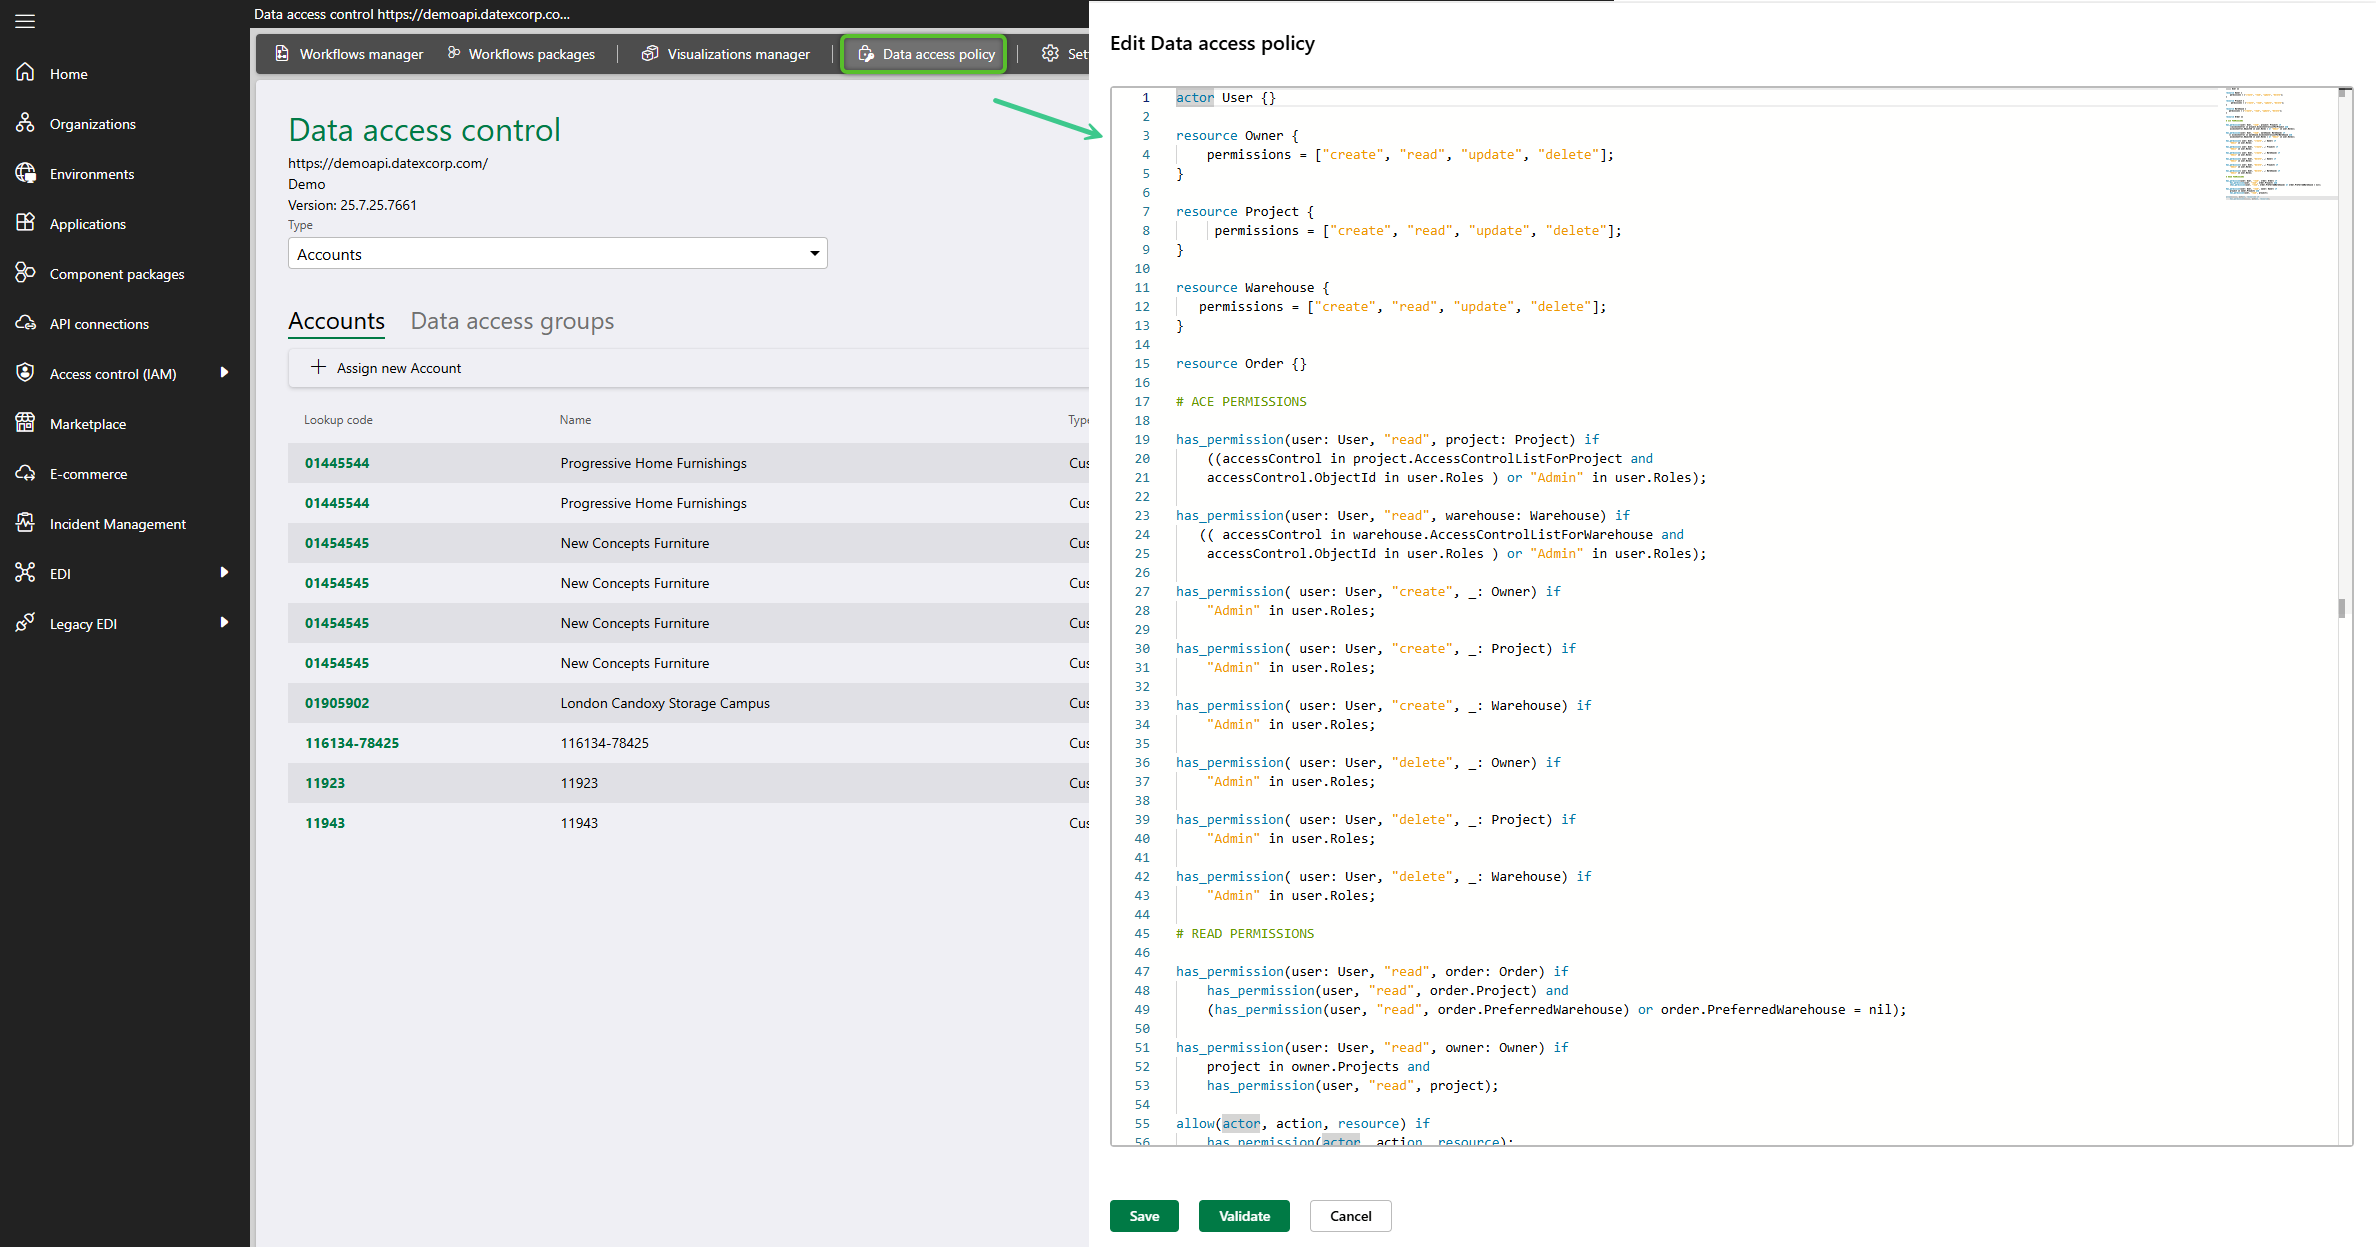
6. While in the API Connection for Prod, click the Data Access Policy button and verify that a policy code is in place. If no code is present, contact Datex to ensure one is added; otherwise, the filters of the Data Access Group will not be applied. If a policy access code is in place, begin assigning users to the created Role and Data Access Group. As noted earlier, it is strongly recommend to test all Roles and Data Access Groups before granting customers access.
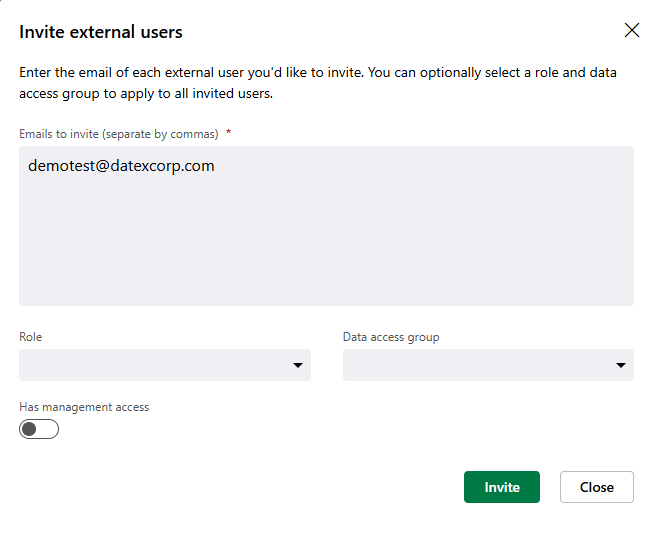
7. With the Role and DAG created for a Footprint Portal user, users can now be invited using the Invite external user option from Access control (IAM)> Users. When completing the invite form, do not toggle on access for either Manager or Studio. Otherwise, use the Role and Data access group drop downs to select and assign the new Portal Role and DAG to the user before sending out the invite.
In this example, the organization has multiple warehouses, and the user access being set up is for a CSR who should not have access the Billing Hub. While the CSR should be able to manage orders, they cannot be allowed to delete them or perform any auto-receiving, picking, or loading actions. Additionally, the CSR should only see orders for the warehouse where they physically work and not for any other warehouse controlled by the organization.
1. A CSR user likely does not need to access Datex Manager or Datex Studio. Therefore, the Manager Access toggle under Access control (IAM)> Users should remain off for any CSR user.
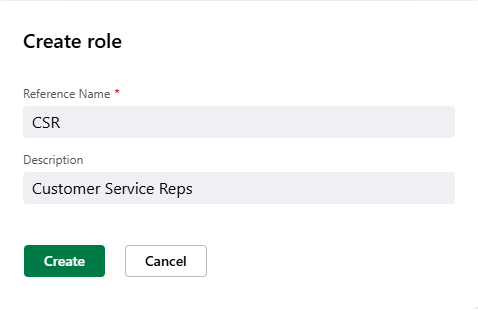
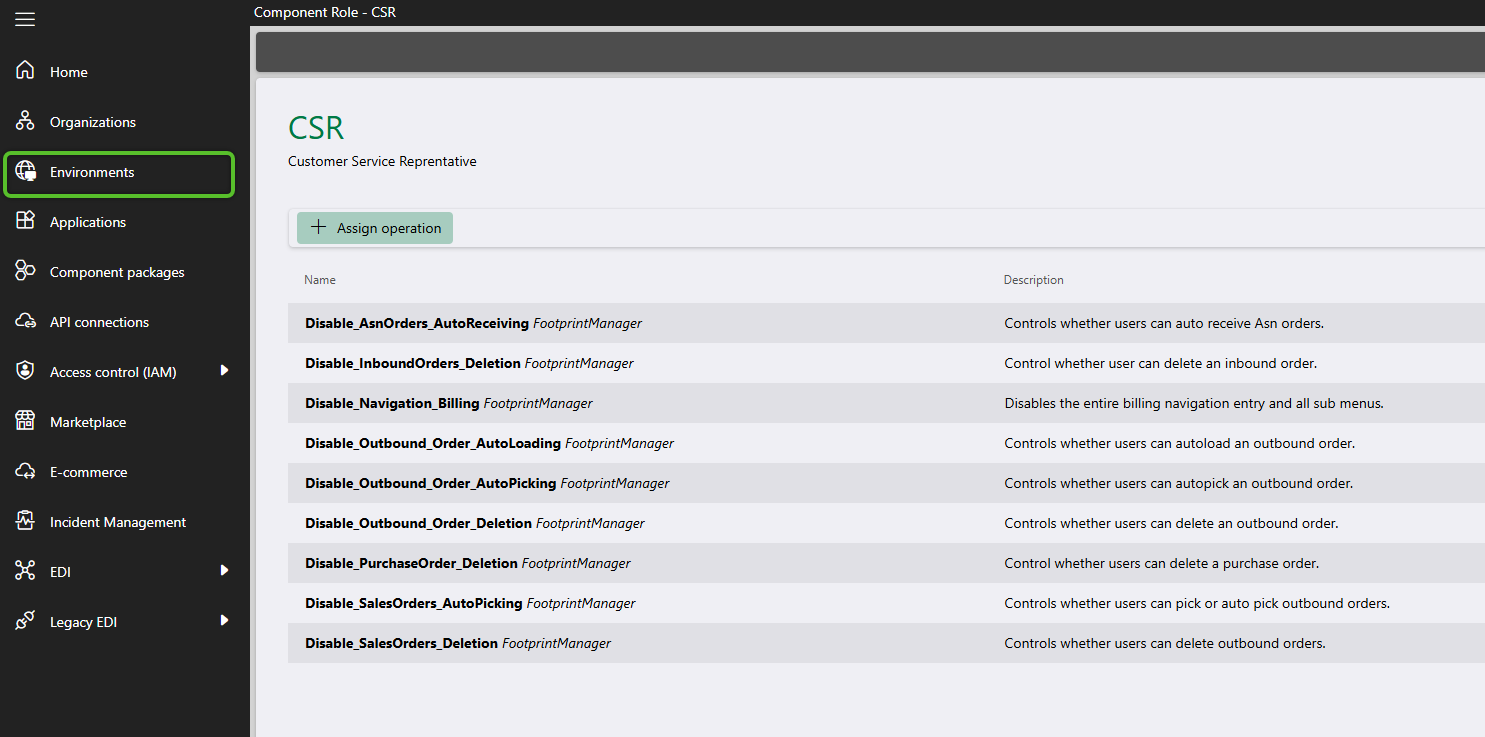
2. Create a Role named "CSR" and assign it to the Footprint application in the Prod environment via Environments using the + Add role button.
3. After the Role is added, click on its Name to open its page and use the +Assign Operations button to open the operations selection window.
Remember, in this example CSR users should be able to create and manage orders but cannot be allowed to delete them or perform automated actions. Additionally, access to the Billing Hub should be restricted.
The following operations have been included or excluded to support this configuration. Additional operations may be added as needed, and it is strongly encouraged to test any Role thoroughly before taking it live.
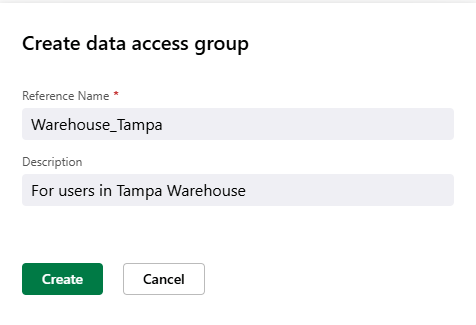
4. Now that the Role is setup a Data Access Group much be configured to limit its assigned users to viewing only one Warehouse. For this example, use a naming convention that begins with "Warehouse_" and name the DAG "Warehouse_Tampa".
5. Once the DAG has been created, navigate to API Connections. Since this configuration is for the "Prod" environment, select the API Connection with the Name "Prod" and the Type "FootPrintApi". After selecting it, set the Type to "Warehouse", add the DAG "Warehouse_Tampa" and include "Tampa" in it. For a more detailed breakdown of this process, refer to Step 2 of the Configuring a Data Access Group How-To.
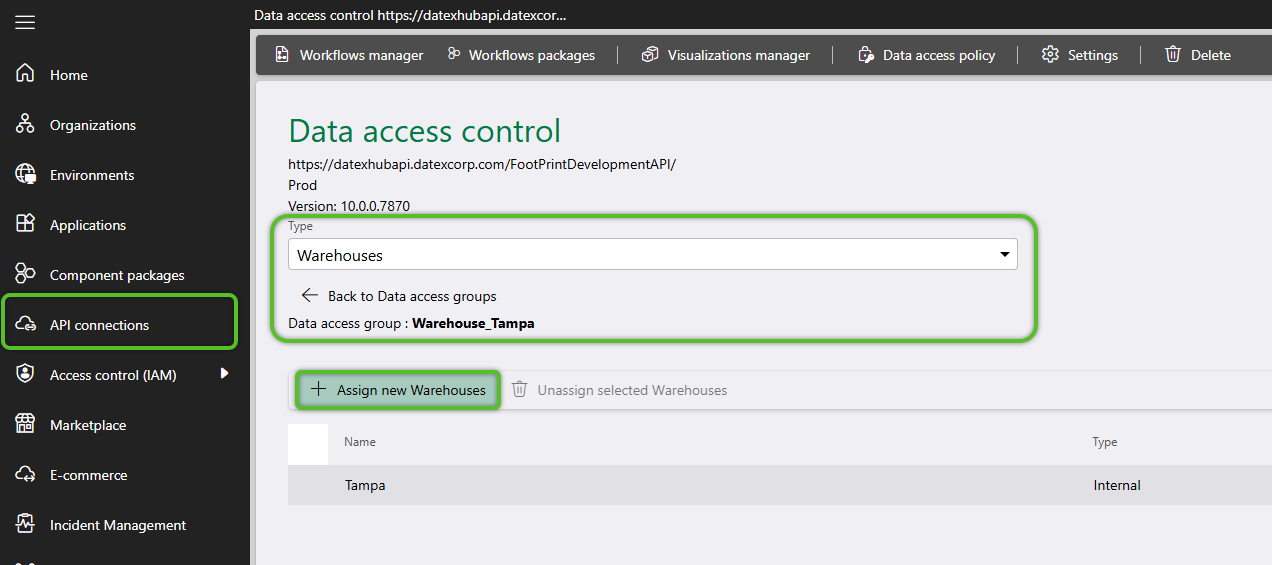
6. While in the API Connection for Prod, click the Data Access Policy button and verify that a policy code is in place. If no code is present, contact Datex to ensure one is added; otherwise, the filters of the Data Access Group will not be applied. If a policy access code is in place, begin assigning users to the created Role and Data Access Group. As noted earlier, it is strongly recommended to test all Roles and Data Access Groups before granting live users access.
| Last Updated: |
| 04/21/2026 |
Copyright © 2026 Datex Corporation